
- Sky
- Blueberry
- Slate
- Blackcurrant
- Watermelon
- Strawberry
- Orange
- Banana
- Apple
- Emerald
- Chocolate
- Charcoal


Dustpuppy
-
Content Count
75 -
Joined
-
Last visited
-
Days Won
19
Posts posted by Dustpuppy
-
-
Made some changes :-)
Internal display handling changed to prevent the flickering. Now only the changed element is refreshed, not the whole gui anymore.
Added the checkbox.Still the same download link on pastebin
-
Hi lads and lassies,
i'm coding on my galacticraft moon base and have made a library for exporting items from an ae2 network.
The handling is very easy. Just connect an adapter to an ae2 interface block and any kind of container (chest, machine) to one side of the interface. Set the direction the interface is connected to the chest.
Items to export will be selected by display name, not with fingerprint. To export dirt use Dirt as item, not minecraft:dirt.
Example code:
local component = require("component")
local meinterface = require("interface_lib")

io.write("Set direction to SOUTH : ")
print(meinterface.setDirection("SOUTH"))

for k, v in pairs(meinterface.getItemList()) do
  print(k, v.size, v.label)
end

io.write("Exporting 5 Dirt ")
print(" " .. tostring(meinterface.export("Dirt", 5, true)))
library functions:
setDirection(direction)
-- has to be called before using the lib to set the direction interface is connected to a container
-- can be UP, DOWN, NORTH, EAST, SOUTH or WEST
getItemList()
-- Retruns a table with size and label of all items in me network
export(label, amount, dots)
-- Exports an amount of items with the given label
-- If dots is true it will write a dot for every item exportet (helpfull to see if it's still working when exporting big amounts)
setExportTime(time)
-- different containers needs different time to wait for finishing the export. A cargo loader for example needs 0.8 seconds and a chest
-- only 0.5 seconds
Here is the lib on pastebin.
-
I've setup everything and allways get "Connection failure" from the gui.
Tried the addresses of the components and the addresses of the adapters in lower and upper cases. Allways the same.
-
Hi again,
here a short code that explains, how to craft an item from an ae2 system. Simply connect an adapter to the me-controller and have the pattern in the system setup.
local component = require("component") local me_controller = component.me_controller local amount = 1 local selection = "minecraft:stick" local craftables = me_controller.getCraftables({name = selection}) if craftables.n >= 1 then -- at least one entry found craftables = craftables[1] -- set craftables to first entry in list local retVal = craftables.request(amount) -- request to craft item(s) end -
Hi,
here is an easy way to export items from the applied energistics 2 network into a chest or other inventory.
First you need to connect an adapter to an ae2 interface block and the inventory where to you want to export on the same interface block.
(see picture)
Then it's easy to handle the export over the interface.
local component = require("component")
local meInterface = component.me_interface
local ser = require("serialization")

local selection = "minecraft:dirt"			-- The item to export
local amount = 10					-- Max 64 (1 stack)

local directionChest = "UP"				-- Where the chest is connected to the interface

local fp = {}                                           -- Table for the fingerprint
local itemList = meInterface.getAvailableItems()	-- Get a list of all items in me-network

for number,item in pairs(itemList) do			-- Go over the list of items
  if item.fingerprint.id == selection then		-- Selected item found
    fp = item.fingerprint				-- Set the fingerprint
    break						-- Stop the loop
  end
end

print("Exporting " .. amount .. " of " .. selection .. " to chest (" .. directionChest .. ")")
meInterface.exportItem(fp, directionChest, amount, 0)	-- Export items
Have fun

-
Try this. It works :-)
local accessCode = "12345" local component = require("component") local gpu = component.gpu local event = require("event") local ser = require("serialization") local term = require("term") local computer = component.computer local door = component.os_door keypad = component.os_keypad customButtons = {"1", "2", "3", "4", "5", "6", "7", "8", "9", "<", "0", "ok"} customButtonColor = {"1", "1", "1", "1", "1", "1", "1", "1", "1", "1", "1", "1"} keypad.setKey(customButtons, customButtonColor) term.clear() print("Security door") print("---------------------------------------------------------------------------") local inputStr = "" while true do ev, address, button, button_label = event.pull("keypad") if ev then if button_label == "ok" then if inputStr == accessCode then term.write("Access granted\n") inputStr = "wellcome" keypad.setDisplay(inputStr) computer.beep() door.toggle() os.sleep(2) door.toggle() else term.write("Access denied\n") inputStr = "ERROR" keypad.setDisplay(inputStr) os.sleep(2) end inputStr = "" elseif button_label == "<" then if string.len(inputStr) > 0 then tmpStr = string.sub(inputStr, 1 , string.len(inputStr) -1) inputStr = tmpStr end else inputStr = inputStr .. button_label end keypad.setDisplay(inputStr) end os.sleep(0) end -
What's the problem? Made 2 the same pattern and put them on 2 different molecular assemblers. If i start a crafting job, both will do it.
-
I don't understand, what exacly you want to do. Do you want the computer start the craftig job in the me system?
-
If you craft only one recipe in a molecular assembler, you don't need interfaces. The assembler has an internal slot for a pattern.
-
If you have Forestry installed, use the worktable. You can scroll over double recipes with it. :-)
-
Then make ur self happy and show me :-)
-
Here's a script for a door access with keypad. Don't need the server or the user database.
local accessCode = "12345" local component = require("component") local gpu = component.gpu local event = require("event") local ser = require("serialization") local term = require("term") local computer = component.computer local door = component.os_door keypad = component.os_keypad customButtons = {"1", "2", "3", "4", "5", "6", "7", "8", "9", "<", "0", "ok"} customButtonColor = {"1", "1", "1", "1", "1", "1", "1", "1", "1", "1", "1", "1"} keypad.setKey(customButtons, customButtonColor) term.clear() print("Security door") print("---------------------------------------------------------------------------") local inputStr = "" while true do ev, address, button, button_label = event.pull("keypad") if ev then if button_label == "ok" then if inputStr == accessCode then term.write("Access granted\n") inputStr = "wellcome" keypad.setDisplay(inputStr) computer.beep() door.toggle() os.sleep(2) door.toggle() else term.write("Access denied\n") inputStr = "ERROR" keypad.setDisplay(inputStr) os.sleep(2) end inputStr = "" elseif button_label == "<" then if string.len(inputStr) > 0 then tmpStr = string.sub(inputStr, 1 , string.len(inputStr) -1) inputStr = tmpStr end else inputStr = inputStr .. button_label end keypad.setDisplay(inputStr) end os.sleep(0) end -
Computer gives a beep now, if access is granted.
-
BIG UPDATE!
I've worked out some updates and a new visual editor for the gui system.
To use the gui just download http://pastebin.com/Dfgc6z0T to a computer as /lib/gui.lua and try your best.
If you don't want to fight with the placing of elements on the screen, then you want to use the visual editor.
It's alpha state, but i hope it will make no errors.
The editor will create a full lua code as frame work for your own program in resolution 80x25 like for a tier 2 screen. But you need a tier 3 screen to use the editor it self. The program you can run then on a tier 2 or tier 3 screen.
Please try it and let me know, what you think. It's a bit flickry when updating the screen, but i hope i get this fixed.
You can download the editor at https://pastebin.com/jdaM8FKG
If you like it, let me know and tell me, what i could change, or what you want me to put into the gui or the editor.
Have fun
-
It's allready a seperated lib. Just download the gui.lua. It's full documented in the source.
-
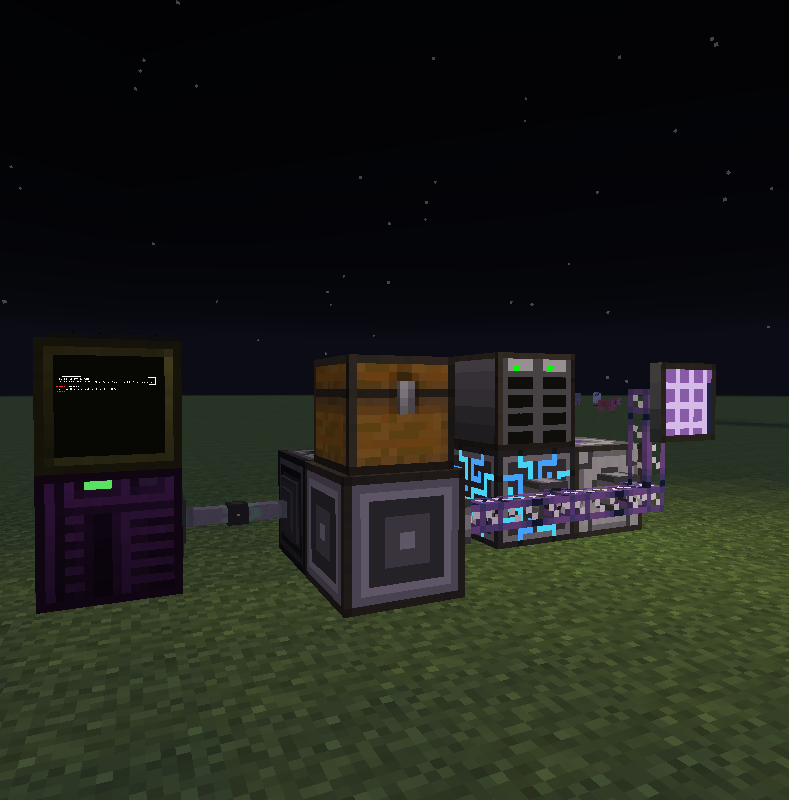
Hi,
now i'am getting complicated :-)
Here's my security system. It's based on opensecurity and oc.
-------------------------------------------------------------------------------------------------------------------------------
What's needed?
The server
Start it before starting any door computer or the card writer system.
The server will handle all user accesses.
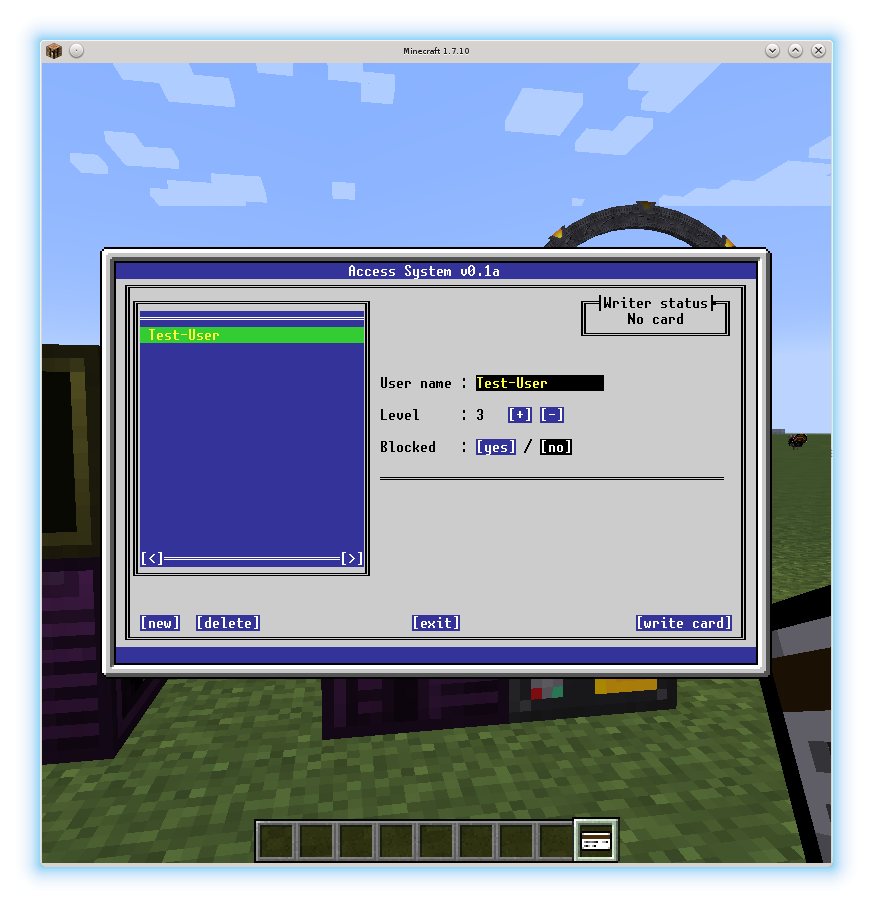
The card writer
This is the main system.
It's with gui to setup all users.
It needs an opensecurity card writer connected.
You can setup new user, edit user or delete user.
A user can be blocked to stop him using a mag card and a level can give to grant access on different doors.
Data will be encrypted on the card.
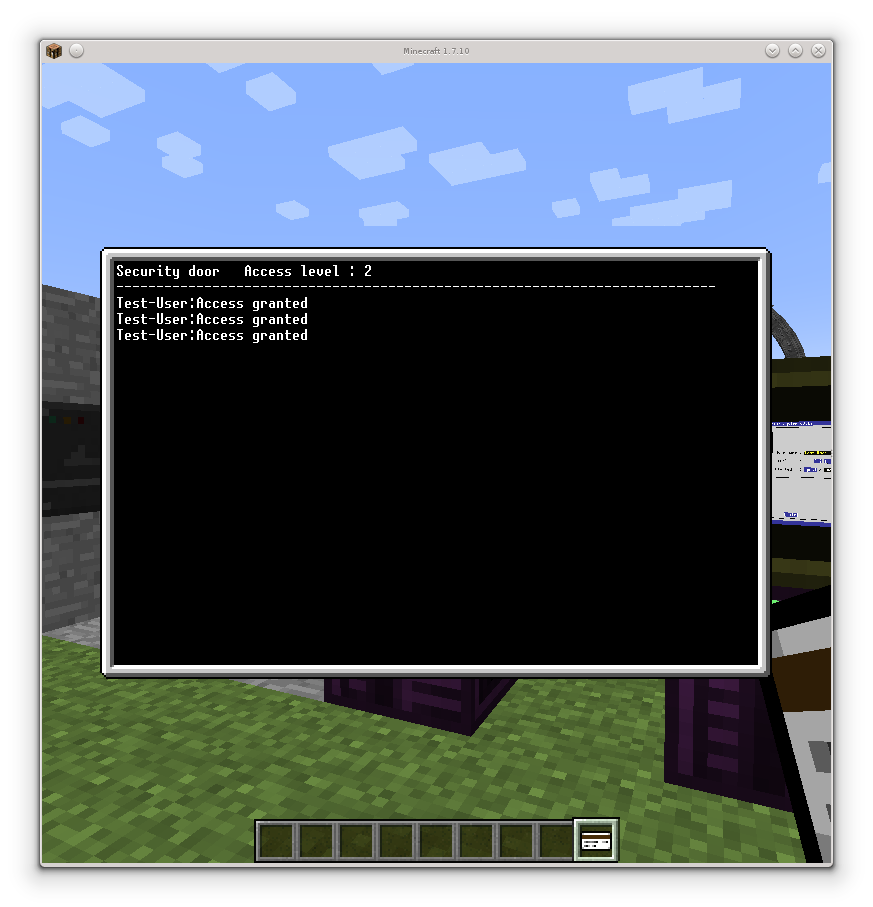
The door systems
This will be used for the door it self.
The computer needs a door controller and a card reader connected.
You can use as much of this systems, as you want.
It's important, that a door computer is started after the server, because it sends his access level to server during start.
The level can be changed in the code. It's this line on the top : local accessLevel = 2
-------------------------------------------------------------------------------------------------------------------------------
All data will be send encrypted over network on port 199. The port and the crypting key can be changed in the source codes on top. Easy to find. :-)
Downloads
The server
The card writer
http://pastebin.com/156Np04X - main program
http://pastebin.com/Dfgc6z0T - the gui system (save it as gui.lua)
The door computer
Hope u get it setup :-) If not, let me know. If i don't answer...good luck ;-)
- LarynxDE and maarten2000ha
-
 2
2
-
Funny. Have just made a security system based on opensecurity. Will possible see, if i upload it, after i've checked it for bugs.
-
Autodialer running :-)
-
Fixed a little problem with empty lists :-)
-
Hi all,
i've made for my self a program to control stargates of lanteacraft. Easy to use with gui. If someone want to have it, can be get over pastebin.
and you need the gui lib, also from pastebin.
To use it, simply connect an adapter to the stargate base and run the program.
Best is to use a tier 2 screen. On tier 3 it looks a bit funny ;-)
If you find a bug, let me know, or keep it :-)
If i get enough feedback, i will update the paste with new versions. Want to insert an auto dialer to search for gates.
-
The navigation upgrade is to handle the waypoints and all positions are relative, not absolute. What i mean is an upgrade, that can be used to get the real coordinates of the world.
-
Hi,
as in the topic, i want to know, if it's not possible to make a card or an upgrade for the robots, that can be used to get the world coordinates.
Would make the robot movement much more easy.
-
And again i did something usefull (i hope).
With this lib you can send a robot to a waypoint with just one call.
local component = require("component")
local wp = require("wp")

wp.enableAutoCharge(true)  -- set this true for automatic charging

wp.goTo("test1", "north")  -- robot goes to waypoint with label "test1" and faces then to the north
Functions :
goTo(name, facing)
Move robot to the waypoint with the given name. Second parameter is only needed, if you want your robot to
turn to north, south, west or east after arriving. Is good if you want to use it for sucking or dropping from chests.
getScanRange()
Return the range in blocks a robot searches for waypoints. Standard is 256 blocks.
setScanRange(range)
Sets the range in blocks a robot searches for waypoints.
enableAutoCharge(value)
Set this to "true" if you have a waypoint with a charger, you want robots to use for automatic charging when running out of energy.
Autocharging is disable by default.
getAutoCharger()
Returns the label of the waypoint with the charger. Standard is "autocharger".
setAutoCharger(name)
Sets the label of the waypoint with the charger, if you don't want to label it "autocharger"
The robot will go up from 5 to 7 blocks of his starting position. Every direction (north, south, east, west) has another height robots will move to prevent collisions.
You can get the lib at pastebin with
pastebin get PhLMDtaN /usr/lib/wp.lua
Greetings
Stephan
-
Hi all!
I've made a working print server for OS with installed network disk and openprinter.
How it works:
It will be started in /etc/rc.d as deamon and opens a TCP port (standard=9100 like in real life) for listening.
A client can use "nprint" to send a file to the server.
The server will format the file and stores it in a queue. With a timer event the server prints line by line for each file in the queue. Each paper will be labelt with the address of the sender and a page number is printed on bottom of page.
Every computer with a network card and a printer can run the server, as long as you give every server a uniqe name/address.
Server is configurable with config file in /etc and logs all events in /var/log. It check's if printer has enough paper, and ink to print. It pauses print jobs, if out of paper or ink.
How to install:
On the server (needs an openprinter)
Install Open OS
Install network disk
pastebin get Bx6YHy9V /etc/rc.d/printserver.lua
pastebin get qKX1QmvE /etc/printserver.cfg
Setup print server in /etc/rc.cfg like enabled={"printserver"}.
Configure server in file /etc/printserver.cfg
Reboot
On the client :
Install Open OS
Install network disk
pastebin get g1B90KxW /usr/bin/nprint.lua
pastebin get 9CDUY8vX /usr/lib/extralib.lua
Wait until server is running and then use nprint to print on server printer.
Known bugs:
Can't use nprint on the server to print on own printer (just use print like before).
What i will do next:
Client based queue managment.
Write some more network based server
Thanks for reading all this shit. Hope i get some feedback.


My gui (Now with visual editor)
in Libraries & API's
Posted
And the next update :-)
Insert a vertical progress bar, that can display value from top to bottom or bottom to top.