
- Sky
- Blueberry
- Slate
- Blackcurrant
- Watermelon
- Strawberry
- Orange
- Banana
- Apple
- Emerald
- Chocolate
- Charcoal


mpmxyz
-
Content Count
56 -
Joined
-
Last visited
-
Days Won
24
Posts posted by mpmxyz
-
-
This software is meant to run in the background and has no graphical interface.
So there wouldn't be much I could show. (apart from the debug mode output, which is included in my post)
Any ideas?
PS: I wrote a detailed introduction on how to set up a turbine and included ready to use examples for reactors and turbines to make up for the missing GUI.
-
-
Did I understand you correctly, that you'd like to copy a component's address?
For blocks it is quite easy: Shift+Ctrl+Right click with an Analyzer on the block.
But I have no idea if it could be easily done with cards and upgrades.
-
Sorry for double posting but I've got another...
Update 24.06.15:
added --verbose option prints what crunch is doingadded --debug option to show stack traces of parsing error messages That means that they aren't included by default anymore. (which increases readability)improved error messages now with file and line numberimproved execution speed by writing a more efficient recursion flattening code That's the thing I mentioned in my previous message. Krutoy's Data Center is still limited by memory because it consists of around 18*8570=154260 tokens That makes around 27 bytes of T3 server memory per token. When you think about the fact that just a table entry in the array part of a table alone already uses around 16 bytes you can see the problem.improved execution speed by increasing the number of characters between forced sleeps during lz77 compression I have to use os.sleep once in a while to avoid "too long without yield" errors. (->inefficient implementation) I'm already thinking about an OC feature request to add a way to yield without pulling events. But I'll have to collect ideas first.@Krutoy242:I also noticed some users coming from computercraft.ru lately. I just wanted to confirm that I'm okay with that. You'd have to translate any feedback for me though. (bug reports or feature requests)

-
Looks like my lazy programming started to haunt you:
--TODO: change pasting system to be top-bottom? (pasting takes n² time at worst case when moving stuff only one level at a time)
Just to explain that: In order to represent lists of values there have to be rules like:
table   = {<content>}
content = <empty> OR <value> , <content>
The parser therefore creates the following structure for "{1,2,3,}":
<table>
 {
 <content>
  1
  ,
  <content>
   2
   ,
   <content>
    3
    ,
    <content>
     <empty>
 }
This unnecessary nesting is currently removed by moving the contents of lower parts of the structure to higher parts.
This has the problem that it has a worst case runtime proportional to the square of the length of a list. And your list is long. Make that squared and you can see how the too long without yield error arises.
Fixing that should be possible.
In the meantime you should use this command for large files:
crunch --notree --lz77 DataCenter
--notree disables the full parsing part. (i.e. no variable replacement -> It shouldn't harm that much because you don't use them.)
--lz77 enables the powerful lz77 compressor which brings your file size down to just 95 KiB.
I updated the command syntax to be "crunch [options] input [output]" as you suggested. That makes it easier to use.
-
is it possible that i could take the output from the camera, import it in to a computer and translate the return into colors or are the numbers random?
The camera is only able to sense a distance. You can translate that into a color for drawing if you want but it won't have any relation to the color of the block the camera might have seen.
How can i use the spoof card i can't find docs on it anywhere not even in game?
EDIT: Is this forum page even still Alive? I know the mod is.
Press Shift while having the mouse over the item to see a description.
For API documentation you should try "=tostring(components.network.send)" in the lua command line. You have an optional parameter there which you don't have with a normal network card.
-
Yeah, the traceback has been in there since I had to fix some nasty bugs.
Update (10.06.15): made traceback on error optional via --debug option
I also took the time to add a small header to all my source files.
I'm also researching more into Deflate since I introduced LZ77 compression to crunch.
It actually is the first step of Deflate. The huffman encoding would be the second one.
(I'd also like to include some more efficient algorithms for compression. -> It'll take some time.)
-
#1:
You can put --options wherever you want. (i.e. --output behind the input file) "shell.parse" doesn't care!
But the whole "user interface" part was just quickly added to the program. I should revisit that part soon...
#2:
That's probably because the original file doesn't have that many local variables defined at the first line of the file.
They are added during compression to avoid repetition of long strings, numbers and global variables.
->The compressed file has a slightly different structure.
#3 + #4:
It's actually the same bug and it's not even mine: https://github.com/MightyPirates/OpenComputers/issues/1207
io.lines seems to have some problems with unicode characters.
Update 07.06.15: modified crunch to use file:lines with a binary stream instead of io.lines
-
Update 06.06.15: --lz77 option is now available!
This option enables compression using a LZ77 variant.
-> You can now achieve space savings of around 50%!
@natedogith1 @dgelessus @Krutoy242:
Thanks for your help!
Your discussion gave me a lot of motivation to look into the topic of compression and your research into permitted characters in long strings helped me a lot since I could simply start writing code instead of beginning with my own tests.
Just for your entertainment, some bugs I ran into during development:
-reference length wasn't limited during compression: Above the limit it was interpreted as the length of a raw string. -> Decompression returned binary madness.
-"\r\n" within the original code has been processed as it is. But the compressed code is stored within a long string. So Lua reduces that to "\n" on compile time, which causes all related string lengths to be wrong. -> again some madness as output
-The decompression code within the compressed files might be stuck in an infinite loop when reading invalid data. (not fixed because the data created by crunch is supposed to be correct in the first place / a check would add unnecessary overhead)
-I had to use a hex editor a lot. Unfortunately the one I used wasn't able to change the file size. (for whatever reason, but at least not 'my' bug)
PS: Report any bugs you find! There are so many test cases I didn't have the time to check for...
-
#1+#2:
I'm using io.lines with an extra parameter to read the file in short 512 byte pieces.
The feature with the extra parameters doesn't exist in Lua 5.1. It instead just reads the file line by line but does not return newline characters.
That makes crunch think the file is just one line.
Now to #1: The file starts with a single line comment and crunch thinks there is only one line... (->It's removed.)
And #2: The words are separated by newline characters only. Imagine what happens, when you ignore them! :-P
Even though I'm not completely supporting 5.1, I'll see if I can add a small workaround in there.
#3:
The keyword 'local' is repeated lot because it is repeated in the original file.
The feature to combine those is on my todo list but it isn't as easy as you might think:
a = 1
local a = 2
local b = a
print(
is not the same as:
a = 1
local a, b = 2, a
print(
#4:
Here we've got a well hidden bug: One of my regular expressions was wrong - I fixed it.
The download should be updated now.
Apart from that I'll have to look into storing line numbers somewhere in the parsing tree to make error messages more clear about where the error should be.
-
Introduction
cbrowse is a program you can use to inspect and modify the lua environment and components - the latter one being the reason I developed such a complex program in the first place.
You can find a detailed description in the man page.
To get a quick overview I recommend the following picture series:
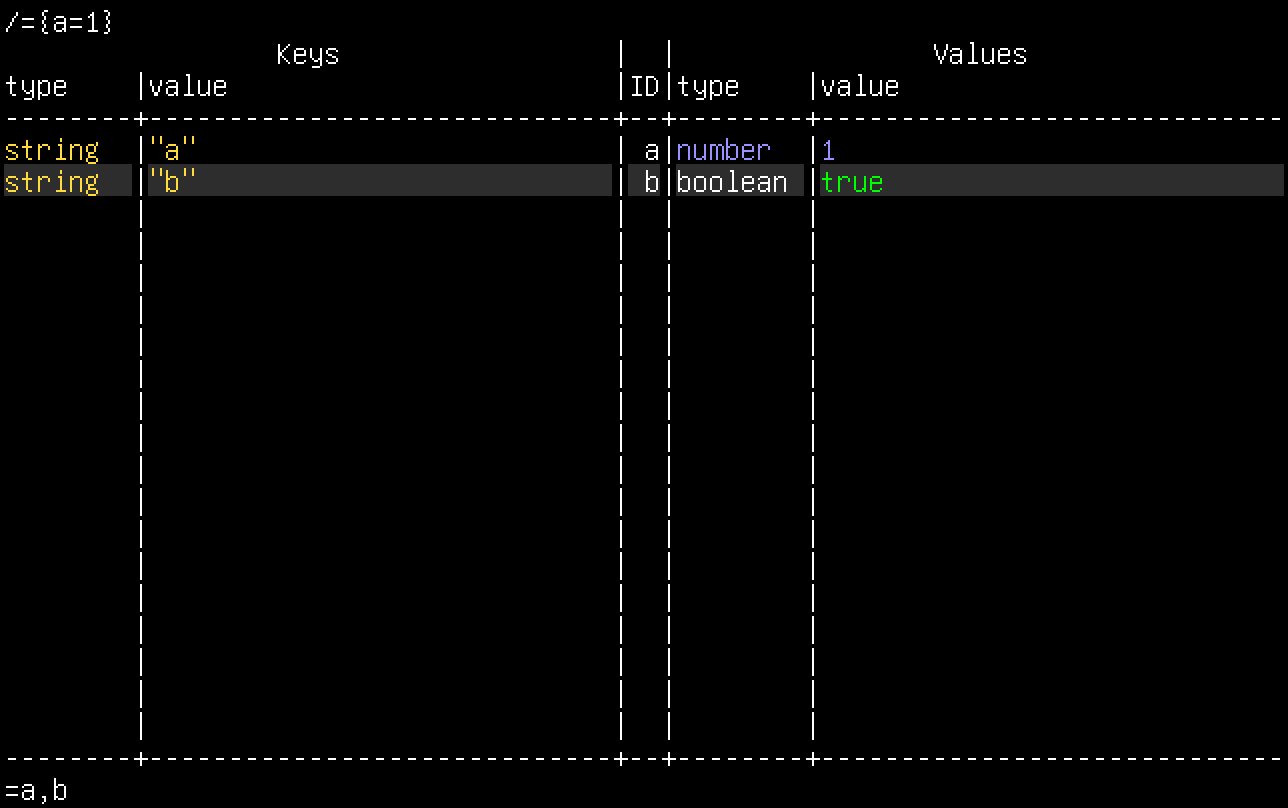
Viewing and Editing

(creating and viewing a new table)
(editing it)
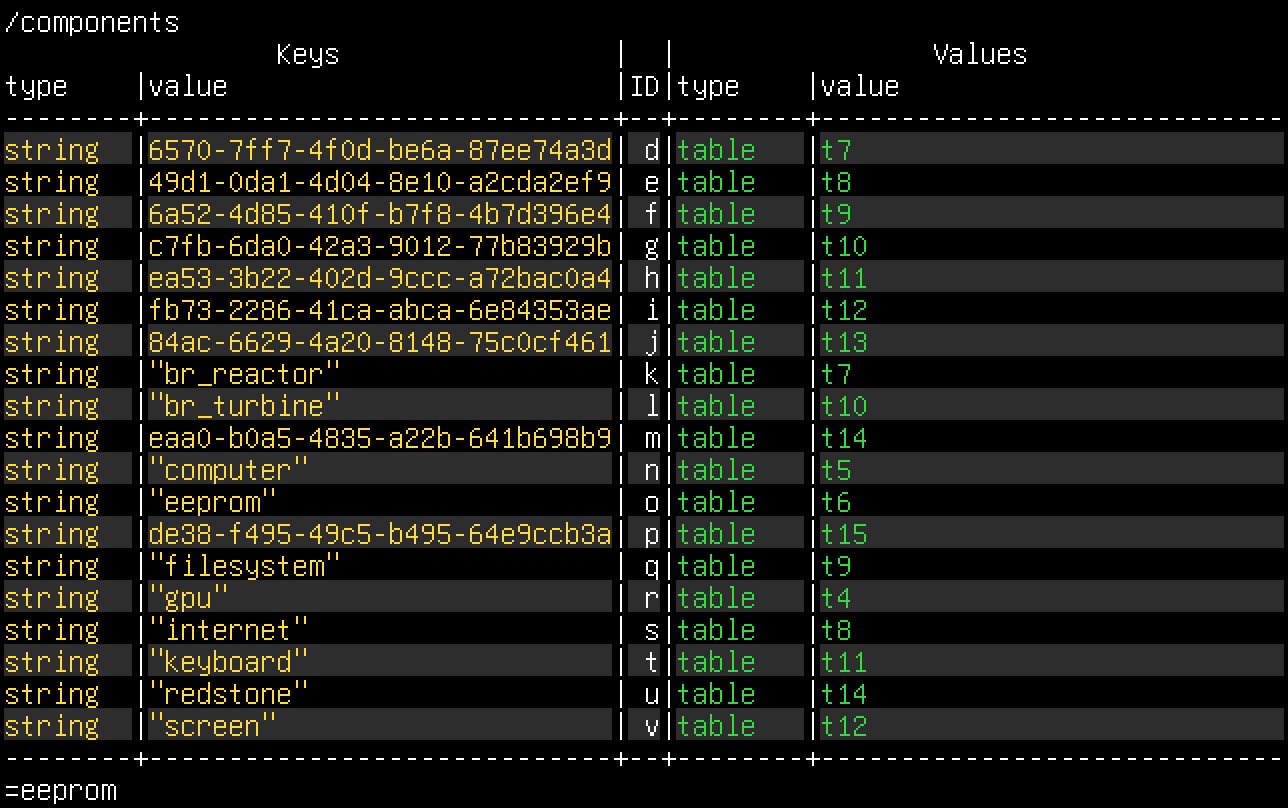
Default Screens
(startup screen)
(contents of "directories")
(contents of "libraries"; also: some libraries hinting at my next project)
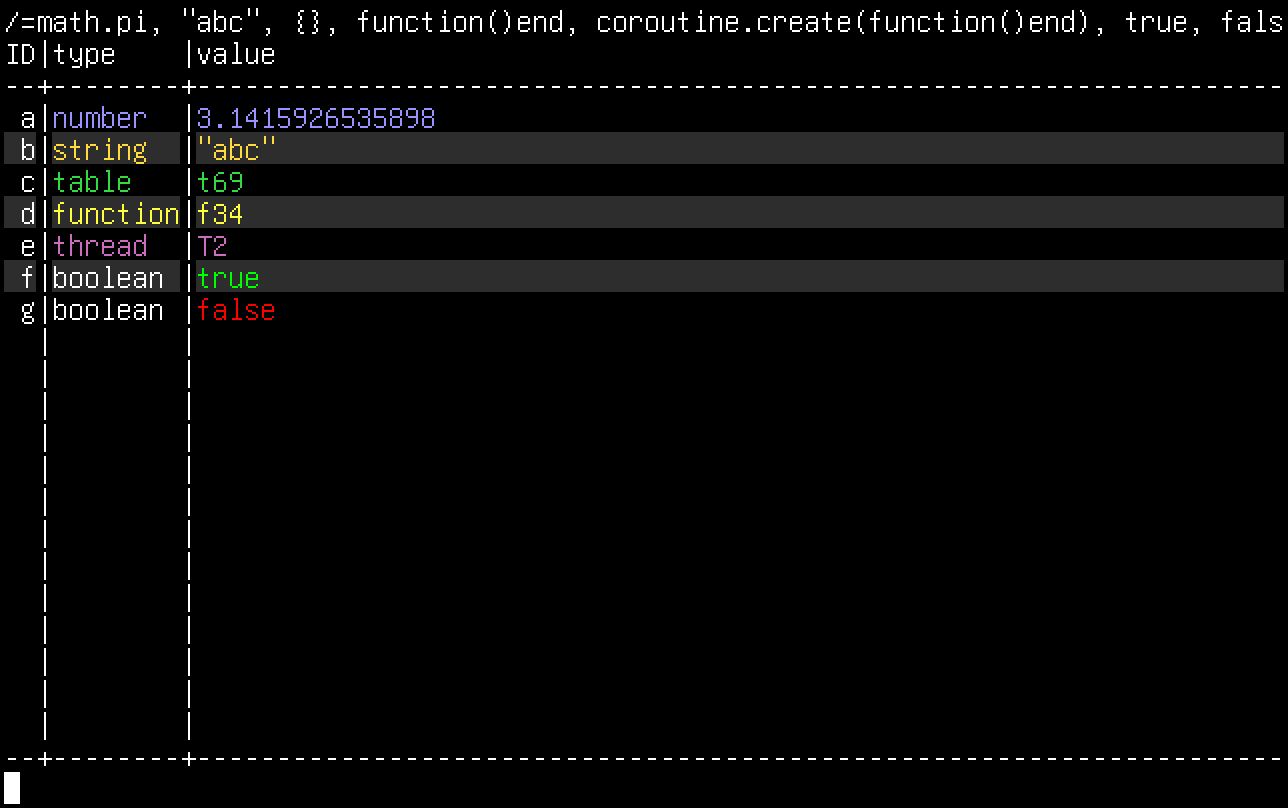
Other Features
(indexing the table using "_V" to choose the values column and ".cn" to chose the cell containing the number 44.)
(a selection of values to show the color highlighting)
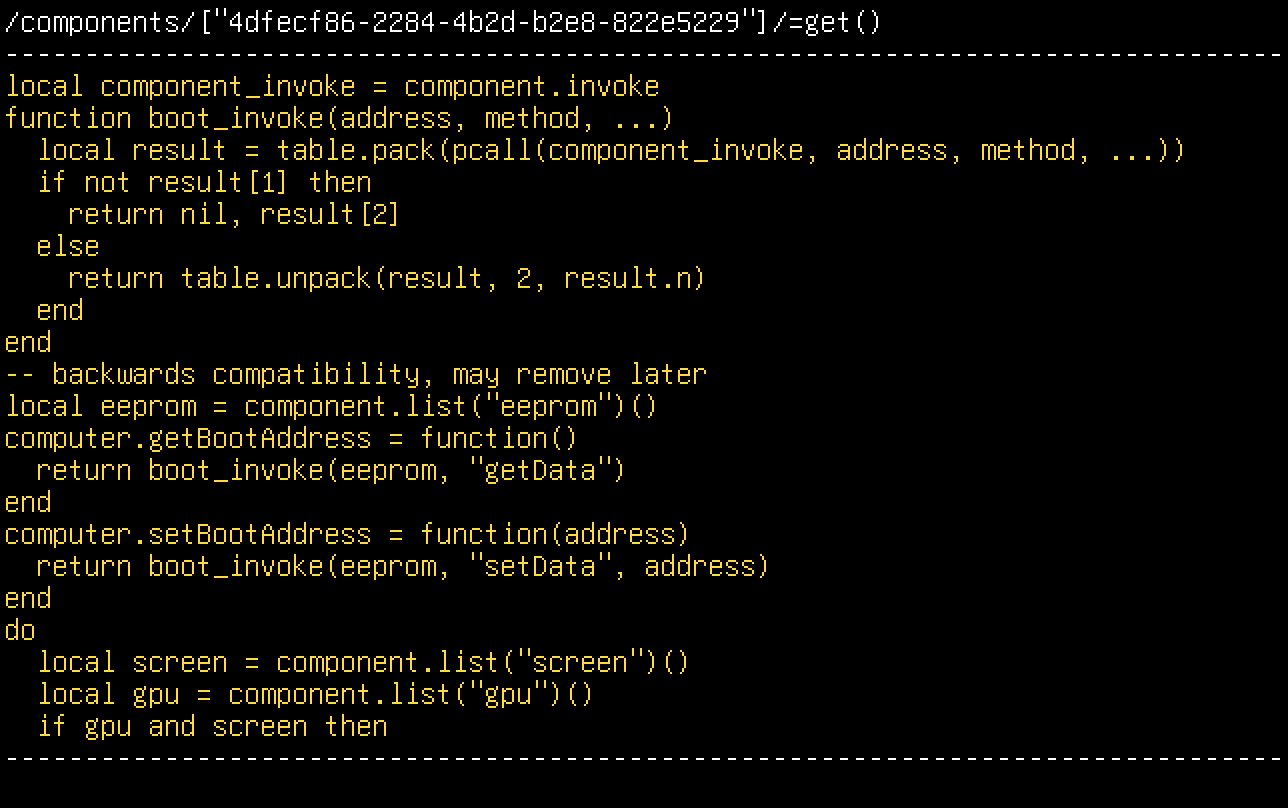
(a screen showing a string value)
Man Page
NAME
  cbrowse - inspecting lua components and other objects

SYNOPSIS
  cbrowse [options] [commands...]

DESCRIPTION
  cbrowse is a development tool with a heavy focus on inspecting Lua objects.

  It features a single command line as input that accepts Lua code or - when using the prefix "sh " including the space - shell commands.
  (includes tab autocompletion for Lua code)
  After hitting enter the command is executed and a list of returned values is displayed if there were any.
  You can return to the previous display via Ctrl+C. The program itself is closed by exiting the top level or via an interrupt. (Ctrl+Alt+C)
  You can reload the display by hitting F5.
  Scrolling is done via Page down/up or via using the mouse wheel.

  There are 3 types of displays:
    list
      This contains a list of values - showing their type in one column and some text to describe their value in another one. (used as default)
      Each value has got a 1 or 2 letter identifier shown to ease access from Lua commands.
      (-> use _V.a to access the first value via Lua, _V.b for the second etc.)
    table
      This contains a combination of keys and values and is used to display Lua tables. (used when a single table is returned)
      Each key value pair has got a 1 or 2 letter identifier as described in the previous paragraph.
      (-> use _K.a to access the first key, _V.b for the second value)
    string
      This shows a Lua string with character based line wrapping. (used when a single string is returned)

  You are able to access a special environment using Lua commands.
  It is a proxy merging the currently viewed object with the global environment and some extra values.
  Since there may be collisions it is necessary to prioritize the contents:
    1st: special values (overrides the other contents)
      There are up to 5 of them:
        _OBJ: the currently displayed object
        _G: the global environment
        _K: a list of keys (if available)
        _V: a list of values (if available)
        _REG: a special registry table used by cbrowse to display names for non primitive values
          When using the name as an index you get the object associated with the name.
          When using an object as an index you get its name.
          You can use the registry for the following types:
            type      name format
            function  "f1234"
            userdata  "u1234"
            thread    "T1234"
            table     "t1234"
    2nd: current object (a list of values is just a table using integer indices)
    3rd: a sandboxed global environment - with automatic require

  Writing access uses the same priority but defaults to the current object as a target if the reading operation didn't find a non nil value.
  (This implies that there IS a reading operation before every writing operation. Use one of the special values to bypass that behaviour.)

  When a command calls a gpu function that might modify the screen it will make cbrowse enter a graphics debug mode:
    -The screen is cleared before the function is executed.
    -After finishing the command the screen will freeze until you hit a key.
  Changes in primary GPU and screen or resolution are also detected. (->The screen is redrawn.)

  cbrowse also supports left and right clicks on keys or values.
    A left click inserts a reference to the clicked object.
    A right click inserts "=reference" and hits enter for you.
      That way you can immediately look at an object you are interested in.
      Functions behave a bit differently:
      "=reference()" is insered and the cursor is moved one character to the left to allow you to type in parameters.

OPTIONS
  --clean
    disables loading libraries and components on startup
    This is highly recommended if you don't have a lot of memory installed.

  --noevent
    disables updates to the list of components

  --env
    uses the first non option parameter as a global environment (_G)

  For non option parameters it tries to find a value by using the parameter:
    1st: as a component address
    2nd: to get a primary component
    3rd: as a library name
    4th: as code executed via the cbrowse command line
  Using the --raw option disables this behaviour and instead uses arguments without processing. (useful if you call cbrowse for debugging your own program)

EXAMPLES
  cbrowse
    starts cbrowse in the default screen

  cbrowse --clean
    starts cbrowse without loading all libraries and components available on the computer
      sh ls
        executes command "ls" in the shell
        cbrowse is waiting for a key input after execution because ls printed some output. (You should have a chance to read it after all.)
  cbrowse redstone
    The initial screen now contains a reference "==default==" to the default object and a reference "redstone" to a redstone component proxy.
      =redstone
        move to the loaded redstone component
      =getInput(sides.north)
        show the redstone input at the northern side of the redstone component

DEBUGGING
  cbrowse can be used as a debugging aid by executing it from within your program:
    local a, b, c = "test", 3.14, os
    require"cbrowse".view(a, b, c)
  Some words of advice though:
    1st
      It will consume events using event.pull. (like term.read)
      If you expect to pull some events after running it, it might change the programs behaviour.
    2nd
      Due to a limitation of shell.execute you can't have nil values as a parameter. All values after a nil value are just ignored.
      (The library is just a shortcut for a shell.execute call.)
      If you need that function, consider using a table:
        require"cbrowse".view{a, b, c}
Depencencies
Software
All required libraries are included in the download.
Hardware
GPU + screen: min. 20x7 monochrome, 80x25 with colors recommended
RAM: min. 384 KiB, recommended: >=512 KiB
Installation
Simply download the tar archive and extract it into the root directory.
All files should then be there where they should be.
Download (last update: 13.04.17)
Ingame:
wget 'https://raw.githubusercontent.com/mpmxyz/ocprograms/master/tars/cbrowse.tar'
tar -xf cbrowse.tar

OR

oppm install cbrowse
Known Issues
There is no shell autocompletion. (I still need to look into it.)
-
Why aren't you using Microcontrollers?
https://github.com/MightyPirates/OpenComputers/issues/788
They can send messages to a specific side. To receive messages from one side only you can combine multiple microcontrollers. (and tell only one of them to forward messages)
-
Without seeing the updated code it's hard to guess. But probably it's just because - according to the documentation - it is should be spelled "Idle". (with a big "I")
One hint for future debugging: Using the function "print" to display important values while running your program helps a lot.
When you do that you have to think about what output you expect and have to compare that to what you got:
dofile("config")

print("energy", s.energyAvailable()) --debug output for energy available
print("state", s.stargateState(), (s.stargateState() == "idle")) --you can also output some of your conditions to see if they are working as expected
if s.energyAvailable() <= 99999 and
 s.stargateState() == "idle" then
  r.setActive(true)
else if s.energyAvailable() == 1000000 or
 s.stargateState() ~= "idle" then
  r.setActive(false)
 end
end
expected output
energy   12345
state    idle      true
real output (at least what I would expect -> never tested):
energy   12345
state    Idle      false   -> "Idle" is not the same as "idle". Therefore the condition fails to work correctly.
I hope that helped. (It makes me think about writing a tutorial for debugging...)
-
Introduction
This program and its library make setting up PID controllers in Minecraft easy.
Controllers are used whenever you want to maintain a certain speed, temperature etc.
An example system in Minecraft would be a Big Reactors turbine:
It takes an adjustable steam flow rate and has a speed that should be maintained at an optimal value of 1800 rpm.
A turbine controller would therefore have the following inputs:
1. the current turbine speed
2. the target turbine speed (1800 rpm)and the following output:
1. steam flow rate (a value that would let the turbine reach and stay at 1800 rpm)
This software uses a PID controller.
It got its name after the three parts its output is calculated from.
The output is the sum of:
1. P(proportional): This part is proportional to the error. (difference between target value and currently measured value)
While it is directly minimizing the error, it alone often can't zero it completely. Too much of it can also lead to instability. (oscillations)
2. I(ntegral): This part is proportional to the sum of all errors accumulated over time.
That makes it perfect to slowly remove the residual error left over by the proportional part, but it increases the tendency for overshooting. (or even oscillations)
3. D(erivative): This part is proportional to the change in error per time.
It is therefore good to limit the speed of error changes. (preventing too fast error increases and slowing down decreases to avoid overshooting -> damping / increasing stability)
But it is vulnerable to noisy measurements. (large changes divided by short durations -> big influence -> output becomes very noisy)The tricky part is determining the correct factors to have a responsive controller but no instabilities. (There is a small Tutorial in the next section.)
If you are interested to learn more, here is a good introduction to controllers:
Screenshots
pid debug turbine.pid
ID:       turbine.pid
Target:   +1800
Current:  +1800
Error:    +0
change/s: +0
PID parts:+0 +914 +0
Output:   +914
gpid
Example / Tutorial (Big Reactors Turbine)
Wikipedia knows a lot of ways on how to find the correct PID parameters.
This one here is called "manual tuning".
But before that we should create a basic controller file:
--PREPARATION--
--Here we just get a reference to the turbine proxy.
local component = require("component")
turbine = component.br_turbine
--INPUTS--
--#1: our measured input
sensor = turbine.getRotorSpeed
--#2: our target value / setpoint
target = 1800

--OUTPUT--
--The actuator table is a description of the output of the controller.
actuator = {
  --The setter is used as the output of the controller.
  set = turbine.setFluidFlowRateMax,
  --The getter is used to initialize the "I part" when (re-)starting the controller.
  --That ensures smooth operation even if you are tuning your controller.
  get = turbine.getFluidFlowRateMax,
  --the minimum and maximum values the controller output might reach
  --It also supports actuators without limits by setting the corresponding value to nil.
  min = 0,
  max = 2000,
}
--PID PARAMETERS--
factors = {
  --proportional factor
  p = 0,
  --integral factor
  i = 0,
  --derivative factor
  d = 0,
}
--OTHER OPTIONS--
--An update frequency of 4 Hz is fast enough but still very lag friendly.
frequency = 4
Now that the preparations are done; let's start working on the PID parameters:
First you should try some values for p.
At first pick a random one, like 2:
--PID PARAMETERS--
factors = {
  --proportional factor
  p = 2,--<==
  --integral factor
  i = 0,
  --derivative factor
  d = 0,
}
Save the changes, manually set the turbine flow to maintain the desired setting and run this command:
pid run yourturbine.pid
The first will load and execute your controller.
If you run the command a second time it will override the running controller with a new one.
That's how you update your controller when you changed anything.
In the meantime your controller started doing its business. But nothing changed?!
That's because the pid library is calculating an integral offset on startup to avoid any sudden control changes when starting the controller - even if you integral factor is 0!
Since your controller doesn't want to change something on its own, you have to challenge him.
Change the target value / setpoint:
pid update yourturbine.pid target=900
This should give you a feeling on how fast your controller would react to changes.
Since you want to make it react as fast as possible, you should increase your p value and test again.
Note: Whenever you change factors, test your changes with different scenarios. (1800 -> 900, 900 -> 1800, 1800 -> 1900 or even some inductor on/off changes)
You continue doing that until you observe an undesired behaviour: oscillations.
With big reactor turbines these oscillations can be quite fast having periods of just a few ticks. (Real world machines would break soon under this conditions.)
To keep some safety margin you should therefore keep the p value at half the value it needed to start oscillations.
Now you can pick an integral factor. (e.g. 2)
--PID PARAMETERS--
factors = {
  --proportional factor
  p = 40,--The turbine in my world started oscillations at p==80.
  --integral factor
  i = 2,--<==
  --derivative factor
  d = 0,
}
Now you can see that the turbine is finally reaching the target speed.
To see what happens in the background you can run this command:
pid debug yourturbine.pid
It will show you a short debug screen:
ID:       turbine.pid --The id of the controller you are looking at
Target:   +1800       --the target value / setpoint
Current:  +1800       --the measured value
Error:    +0          --error: target value - measured value
change/s: +0          --rate of error changes
PID parts:+0 +914 +0  --proportional, integral and derivative parts
Output:   +914        --output: sum of parts
Over time the integral part will change to the output that is required to maintain your setpoint and at the same time you will see how the other parts will become smaller and smaller. But depending on how well you guessed it might take a while. Increase the integral factor until you reach the point at which the controller starts to overshoot.
Now you have several options:
1st: Continue by adjusting the D(erivative) factor which would be set to reduce the overshoot and the time it needs to reach the setpoint.
Attention: It should be quite small. Else the controller might overreact to its own changes.
2nd: Reduce the integral factor a bit and finish here: A turbine controller doesn't necessarily need a derivative part to work "good enough".
If you just want to quickly set up a reactor with a turbine, you can use the sample files available as another download.
(You might want to tweak the factors because your setup might be different to my setup.)
One thing you might note: The factors of the reactor controller are negative.
This is because an increase in control rod level decreases the reactor output.
Keep that in mind if you are designing a controller for a completely different system!
In a newer update a program with a graphical user interface has been introduced: gpid
Just run this command:
gpidYou can interact with the interface by using your mouse or by hitting the arrow keys and enter.
Man Pages
pid
NAME
  pid - PID controllers for Minecraft

SYNOPSIS
  pid <action> file or id [var=value or =var ...] [--args ...]
  pid debug [ids ...]

DESCRIPTION
  Set up your PID controllers the easy way:
  Just create a controller file and run "pid run yourfile.pid". You controller is running in the background.
  The file name of a controller is used as an ID when none is given in the file.
  You can show and modify values using =var or var=value respectively:
   var                 meaning
     target    tgt  t    target value
     frequency freq f    update frequency in Hz
     p                   proportional factor
     i                   integral factor
     d                   derivative factor
     min                 minimum output value
     max                 maximum output value

  The actions "run" and "load" also accept the option "--args" followed by arguments that should be forwarded to the file being loaded.

ACTIONS
  pid needs an action parameter telling it what it has to do.

  run
    loads and starts a PID
  load
    loads a PID but doesn't start it
  update
    updates only (to update PID vars)
  unload
    stops and unregisters a PID
  start
    (re-)starts a PID
  stop
    stops a PID

  debug
    shows a debug screen - the most important parameters are displayed for each given controller

EXAMPLES
  pid run reactor.pid
    loads and starts the controller from file "reactor.pid"
    It's assigned the ID "reactor.pid" unless there is an overriding assignment in the file.

  pid load /pids/turbine.pid --args bada4648-3559-4784-b3c7-06c146d9dc3b
    loads the controller file "/pids/turbine.pid"
    The string argument "bada4648-3559-4784-b3c7-06c146d9dc3b" is used when loading the file.
    The controller is assigned the ID "turbine.pid" unless there is an overriding assignment in the file.

  pid start turbine.pid
    starts the controller "turbine.pid"

  pid update turbine.pid target=900
    reduces the speed of the turbine to 900 rpm

  pid debug reactor.pid turbine.pid
    displays debug information of two controllers in one screen
    Each controller needs 8 lines on the screen. Debug information isn't displayed if there isn't enough space left.
    You can leave the debug screen by doing a soft interrupt. (Ctrl + C)

  pid stop turbine.pid
    stops the given controller

  pid unload reactor.pid
    stops and unregisters the controller
gpid
coming soonAPI
You can use the library via require("pid").
Functionspid.new(controller:table, [id, enable:boolean, stopPrevious:boolean]) -> controller:table, previous:table, previousIsRunning:boolean Creates a pid controller by adding methods to the given controller table. For convenience it is also automaticly started unless enable is false. (default is true) Controllers can be registered globally using the id parameter. (or field; but the parameter takes priority) There can only be one controller with the same id. Existing controllers will be replaced. (and stopped if stopPrevious is true) pid.loadFile(file, enable, ...) -> controller:table, id loads a controller from a given source file The file is loaded with a custom environment which combines the normal environment with a controller table. Writing access is always redirected to the controller table. Reading access is first redirected to the controller and, if the value is nil, it is redirected to the normal environment. Additional parameters are forwarded when the main chunk of the file is called. pid.get(id) -> controller:table returns the controller registered with the given id pid.getID(controller:table) -> id gets the id the given PID controller is registered with pid.register(controller:table, [stopPrevious:boolean, id]) -> old pid:table, wasRunning:boolean registers a controller using either the id field as a key or the id parameter given to the function A controller can only be registered once and only one controller can be registered with a given id. If one tries to register a controller multiple times it is only registered with the last id. If one tries to register multiple controllers on the same id only the last controller stays. You can order the controller being previously registered with the same id to stop using the parameter "stop". pid.removeID(id, [stop:boolean]) -> old pid:table, wasRunning:boolean removes the controller with the given id from the registry You can also order the controller to stop using the parameter "stop". pid.remove(controller:table, [stop:boolean]) -> wasRunning:boolean removes the given controller from the registry You can also order the controller to stop using the parameter "stop". pid.registry() -> proxy:table returns a read only proxy of the registry Read only access ensures that the internal reverse registry stays updated. controller:doStep(dt:number) runs the controller calculation for the given time interval controller:forceOffset(newOffset:number) changes the internal offset of the controller (in case you feel the need for a manual override...) controller:start() starts the controller controller:isRunning() -> boolean returns true if the controller is already running controller:stop() stops the controller controller:isValid() -> true or false, errorText:string returns true if the controller seems to be valid returns false and an error message if the controller is invalid controller:assertValid() errors if the controller is not valid controller:getID() -> id see pid.getID controller:register([stopPrevious:boolean, id]) -> old pid:table, wasRunning:boolean see pid.register controller:remove([stop:boolean]) -> wasRunning:boolean see pid.remove
Propertiescontroller={ sensor=value, --a function returning the value being controlled target=value, --the value that the controlled value should reach actuator={ --The actuator is the thing that is 'working' on your system. set=function(number), --It is 'actuated' using this setter function. get=value or nil, --For better jump starting capabilities it is recommended to also add a getter function. min=value or nil, --Minimum and maximum values can also be set to define the range of control inputs to the actuator. max=value or nil, --The limit can also be one sided. (e.g. from 0 to infinity) }, factors={ --These are the factors that define the behaviour of the PID controller. It has even got its name from them. p=value, --P: proportional, factor applied to the error (current value - target value) is added directly acts like a spring, increases tendency to return to target, but might leave some residual error i=value, --I: integral, factor applied to the error before adding it to the offset value the offset value is added increases tendency to return to target and reduces residual error, but also adds some kind of inertia -> more prone to oscillations d=value, --D: derivative, factor applied to the change of error per second is added directly can be used to dampen instabilities caused by the other factors (needs smooth input values to work properly) }, --The sum of all parts is the controller output. frequency=number, --the update frequency in updates per second id = optional, --the id used to register the controller }
When the controller is active, it is also updating a debug info table:
  controller.info = {
    p=number,               --currently used P factor
    i=number,               --currently used I factor
    d=number,               --currently used D factor
    dt=number,              --current time interval between update cycles
    value=number,           --current sensor output
    target=number,          --current setpoint
    error=target-value,     --current error (defined as the given difference)
    lastError=number,       --error of last cycle (used to calculate D term)
    controlMin=number,      --lower limit of control output
    controlMax=number,      --upper limit of control output
    rawP=p*currentError,        --p component of sum
    rawI=old offset+i*dt*error, --i component of sum
    rawD=d*derror,              --d component of sum
    rawSum=rawP+rawI+rawD,  --sum of PID components (limits not applied)

    doffset=i*dt*error or 0,--change in offset (this cycle); can be forced to 0 when output value is on the limit
    offset=number,          --new offset, after adding doffset

    derror=(error-lastError) / dt,   --rate of change of error since last cycle
    output=p*error+d*derror+offset,  --rawSum with output limits applied
  }
Dependencies
Software
only OpenOS
Hardware
RAM: almost nothing on top of what OpenOS is already using
Installation
Simply download the tar archive and extract it into the root directory.
All files should then be there where they should be.
Download (last update: 07.11.15)
github: program and libraryIngame:
#program + library:
wget 'https://github.com/mpmxyz/ocprograms/raw/master/tars/pid.tar'
tar -xf pid.tar
#sample controllers:
wget 'https://github.com/mpmxyz/ocprograms/raw/master/tars/pids.tar'
tar -xf pids.tar

OR

oppm install mpmpid
Known Issues
currently noneFeel free to ask, if anything is unclear.
Control Engineering has never been part of my curriculum; so if you know more and would like to share something - like an automatic tuning algorithm, feel free to do so.
-
Very nice idea. I haven't tested it yet but there is the line
local probe = not #targets
which is probably not working as expected: probe is always false because #targets always returns a number.
Support for OpenComputers networks would be very nice indeed. Maybe there are already some file hosting protocols/programs for OpenComputers out there. (e.g. available via https://github.com/OpenPrograms)
-
Fun fact: "The other mod" also uses an event loop. But it is waiting for a special timer event instead of actively checking the time.
(Yes, you can also read all CC lua source files if you open it's Jar file. But searching OCs files in github is far easier.
) -
A lot of functions actually come from OpenOS, which is not installable on micro controllers and drones. (no floppy or HDD)
os.sleep as an example can be found in /boot/02_io.lua, line 66. (You could use that as a base for your own implementation for drones.)
-
Nice.
I see a swarm bombing program coming up soon... (sounds like a good opportunity to try out networking)
-
I played around with drones today and just for fun I wanted to create some kind of bombing drone.
To do that it would need to carry some payload to specified coordinates and "deliver" it there.
The problem is the last part: Drones can't place blocks in midair and you can't give them an Angel Upgrade.
Was that on purpose to make robots more powerful or is it an oversight?
-
Introduction
imagine you are programming a drone or a microcontroller... And then you are hitting the EEPROM limits - 4KiB isn't a lot of space. Now you could start writing ugly code but there is a better solution:
Crunch!
Crunch is a program that compresses Lua source files.
Depending on the input file size and the amount of memory available it is able to utilize a variety of methods to keep the output size small. That is starting with simple token based whitespace reduction and reaching to full parsing and scoping rules to replace local variables with shorter names. For even better compression it is also able to do a kind of lossy compression when replacing long globals with short local variables.
When using crunch you can focus on a more commented and nice looking code instead of worrying too much about keeping names short.
Even code that has been written with being small in mind can profit from it:
Skex has been reduced from 3990 bytes to 2357 bytes. More than 40% reduction!
Man Page
NAME
  crunch - a source code compressor for OpenComputers

SYNOPSIS
  crunch [options] INPUT.lua [OUTPUT, default: INPUT.cr.lua]

DESCRIPTION
  compresses lua source files with minimal changes to behaviour
  The most common use case is to prepare code for an EEPROM.
  (-> allows using more complex code within the EEPROM limits)

  Token Compression (lossless)
  ->remove comments and unnecessary whitespace
  (to be implemented: shorten strings and numbers)
  Compression with Tree Parsing
  ->includes everything from "token compression"
  ->shortens local variable names (lossless)
  ->replaces string, number, boolean and nil constants (lossless)
  ->replaces global variables by local variables (lossy when relying on side effects from outside code or _ENV changes)

OPTIONS
  --lz77[=10..230]
    enables lz77 compression
    The optional value defaults to 80 and defines the maximum length of a reference.
    All length values that are higher are used to define an uncompressed sequence of characters.
    Increasing the maximum reference length therefore reduces the maximum uncompressed sequence length.
    It is therefore best to find a balance between both extremes. (If you really need those 12 bytes...)

  --blacklist=name1,name2
    doesn't touch the given globals
    That prevents them being replaced by shortened locals.
    It is necessary e.g. if they are used with side effects from external scripts.

  --blacklist=*
    doesn't touch globals at all
    The output code is guaranteed to behave like the input code but it is a bit larger than normal compressed code.

  --tree
    forces tree parsing
    (->building a parsing table if it doesn't exist)

  --notree
    forces using only token compression (-> no variable renaming)

EXAMPLES
  crunch hello.lua
    compresses the file "hello.lua" using "hello.cr.lua" as output

  crunch --blacklist=_G,table a.lua b.lua
    compresses "a.lua" while leaving any part referring to the globals "_G" and "table" untouched
    The output is written to the file "b.lua".

  crunch --notree edit.lua
    compresses "edit.lua" using only token compression

  crunch --lz77 edit.lua
    compresses "edit.lua" with lz77 compression enabled
Depencencies
Software
All required libraries are included in the download.
Hardware
RAM: min. 512 KiB1, recommended: 1 MiB for small files, 2 MiB for big files2
Note 1: That needs removing the library "parser.lualr" from file system and only allows token based compression.
Note 2: Full parsing is quite demanding because it is using bottom up parsing which requires the whole tree structure to be in memory.
Installation
Simply download the tar archive and extract it into the root directory.
All files should then be there where they should be.
Download (last update: 13.04.17)
Ingame:
cd /
wget 'https://raw.githubusercontent.com/mpmxyz/ocprograms/master/tars/crunch.tar'
tar -xf crunch.tar

OR

oppm install crunch
Known Issues
The 'lossy' global-to-local compression cannot be used if a global variable is used with side effects to other files. Blacklist those globals to avoid errors. (example: "--blacklist=require" when compressing the default "Lua BIOS")
-
Your problem is that the function checkPlayerPos always returns in the first if statement.
--check the given condition
if (dir == "up") and (player.y == 1) then
 --if it is true: execute this part
 return false
else
 --if it isn't: execute this part
 return true
end
--The code below is never executed because both parts return.
You'd have to modify your if statements so that they don't always return but instead continue with the next if statement.
If you don't want to think about it; read this spoiler:
Remove the else part of all ifs except the last one.
-
1) Default Lua libraries are already loaded in _G. To load other libraries you have to use 'require'.
You can read in the Lua 5.2 documentation how 'require' works in detail.
Here is the short version:
1st: It checks the contents of 'package.loaded' to find out if the library has already been loaded.
2nd: If not, it checks the contents of 'package.preload'. Any function found is executed and it's return values are returned.
3rd: If steps 1+2 failed it uses 'package.path' to find and execute a file
To find all loaded and preloaded libraries you just have to iterate the tables and remember the corresponding keys.
You can use them as a parameter for 'require' to get the library.
Finding libraries loaded by step 3 is a bit trickier:
You have to search the file system.
I've written such a function for a project of mine. (a component/library 'browser' for viewing and testing components and libraries; on my to do list for release)
Here is an extract:
--find libraries (loaded, preloaded and in lib directory)
local filesystem = require("filesystem")
--the list of all libraries (name -> loaded library)
local libraries = {}
--a function that loads all libraries for the given template
local function addLibs(path)
  --extract the directory, the file prefix and the file suffix around the "?"
  local dir, prefix, ext = path:match("^(.-)([^/]*)%?([^/]*)$")
  --don't search working dir
  if dir and prefix and ext and dir ~= "./" and dir ~= "" then
    for file in filesystem.list(dir) do
      --don't require directories
      if file:sub(-1, -1) ~= "/" then
        local libname = file:gsub(ext.."$", ""):gsub("^"..prefix,"")
        local ok, lib = pcall(require, libname)
        libraries[libname] = lib
      end
    end
  end
end
--iterates all templates in package.path and loads all libraries
for path in package.path:gmatch("[^;]+") do
  addLibs(path)
end
--add preloaded libraries
for libname, loader in pairs(package.preload) do
  local ok, lib = pcall(require, libname)
  libraries[libname] = lib
end
--add loaded libraries
for libname, library in pairs(package.loaded) do
  if library ~= false then
    libraries[libname] = library
  end
end
If you just want to find documentation, read the wiki: http://ocdoc.cil.li/
2) Since OC uses Lua 5.2 it does not have 'setfenv' anymore.
You can specify the environment when loading code but can't change it from the outside thereafter.
It is still possible to change the environment from inside the affected code: Just overwrite '_ENV' or create a new local variable with the same name.
3) Yes they are. Check 'gpu.setResolution'!
And you can also click them if they are Tier2 or Tier 3 and if they don't have an attached keyboard.
(You have to use shift+right click if they have a keyboard.)
4) Install an Internet card. It automaticly adds the programs 'wget' and 'pastebin'.
-
What I see is that you create one of two buttons at the beginning of the program depending on the value of isRefueling.
But it isn't updated when isRefueling is changed.
(Another error, Lua is case sensitive: IsTownActive and isTownActive are two different variables.)
But all in all that are just 'normal' bugs.
So, which problems do you exactly have? (Expected vs. observed behaviour, error messages etc.)
If that is specified more clearly it is easier to help you.
-
I'm using a LR(1) parser and I haven't separated building its parsing table and the actual parsing yet. (But that's easy since this table stays the same.)
I implemented it that way because serializing this table was less of a priority while testing. (It only takes 3 seconds to build with a lot of profiling included; fast enough for testing without the need to have a separate 'build step'.)
The parsing table itself consists of around 200 tables with 50k entries. (I'm considering adding code to make it a LALR parser which should cut down on the number of states.)
That's why. (In short: It's still work in progress and I wanted to get it running first. Now would be the time for optimization.)
EDIT: I've just implemented LALR and parsing table serialization.
The table now has 5000 entries and needs only 48 KiB disk space. (90% decrease in size)
Memory measurements using pure lua peaked at 1.5 MiB for a small file and 2.9 MiB for a 50 KiB file. So it's going in the right direction. (I still haven't done any optimization yet.)
There are several things that take their memory:
-a self made regex library to cut code into tokens
-a lot of memoization (memory -> speed tradeoff); I have to check here if I forgot to mark some tables as 'weak'.
-all the strings and tables that are the output of parsing need their space (approx. 20k strings with a few thousand tables for the 50 KiB file)EDIT2: Writing a code compressor using the parsing library was quite easy. Just by removing comments and whitespace and by modifying local variables it's able to achieve a compression ration of about 2:1. (It's not even touching global variables or table indexing!)
I'm going to refine it a bit before publishing. That should be done within the next days.


Crunch - break the 4K limit!
in Programs
Posted
Update 12.08.15:
Crunch has been rewritten to be modular. This made adding new features easier. Some of them are:
-compressing multiple occurrences of "t.veryLongIndex" with "t[x]" (x being a variable with the value of "veryLongIndex")
-unification of string and number values using the shortest representation with the same value ("\"test\"" vs. [["test"]] vs. '"test"')
-The program can be interrupted by pressing Ctrl + C. (It might be delayed when tree processing is enabled.)
Does anyone have suggestions for further improvements?
I'll see if I can implement them nicely using the modular system.
Regarding self extracting archives: How would such a file store its data?
-as a string: The extracting code is easier.
-hidden in comments: This would enable very large self extracting files if loadfile was modified to use a loader function instead of "file:read("*a")".
Additionally: Both have their problems with "forbidden characters".
I also have to decide if I add this feature to Tar or to a new program. (Maybe a program that uses Tars output?)