
- Sky
- Blueberry
- Slate
- Blackcurrant
- Watermelon
- Strawberry
- Orange
- Banana
- Apple
- Emerald
- Chocolate
- Charcoal


LightningShock
-
Content Count
11 -
Joined
-
Last visited
Posts posted by LightningShock
-
-
Robots cannot attack players(eh, at least on the version I play on, it's slightly outdated), even when PvP is on(fakeplayers, that's why it's important), is this intended? It can still attack entities, but not players. They do successfully swing their sword upon them, but they deal no damage. Should I report to GitHub?
-
I think a port like port 1 should be reserved for broadcasts, so that computers following this list always have that port open so that new computers attached to the network know what port to use in order to join that network(other computers being aware of it's existence).
-
Let me ask again. Is your virtual waypoint supposed to be seen by navigation upgrades in range other that the one who created it?
-
So like, that virtual waypoint can be seen by any robot in range?
-
It's a very handy program, however there's room for optimization. The robot was wasting a lot of time and energy while building the sphere, because sometimes it was running side by side instead of taking a circular path
-
mc also means microcontroller if you didn't know.
Hello there, were you banging your head against a wall while you tried to automate Draconic Evolution's Fusion Crafting? Well, I was about to, but I realized OpenComputers has got my back(like always). So, I wrote this simple program that runs on a mc to do this job properly for me. I made it with Applied Energestics auto-crafting in mind and I've got a mod that implements transporting pipes that can round-robin one item at a time(EnderIO) in the modpack I play on, so if you want it to run based on something else, you might need to tweak this a lot. It's also kinda smart, it can tell if the recipe is a normal in-out crafting one, or it it's upgrading a tool, so it is going to route items accordingly.
Pros:- easy to setup
- reliable
- has an "upgrade" mode that will make the fusion core self-feed so you can upgrade easily
- all the cons can be overcome if you modify the code to your needs.
Cons:
- it relies on something else to transfer items into the injectors one by one.
- "upgrade" mode is not fully automatic, you need to manually place your tool inside the core and to place your required upgrade key inside any injector, and to take them out after you are done(still automatic if you are doing the same upgrade)
- there is room for improving the energy consumption for the mc, however do you really mind extra ~1RF/t after you've got a fusion crafting system?
- requires a dummy item(I use a stone block, and it doesn't care about NBT)
- it expects all the ingredients of only ONE crafting session to be pumped all at once(in a single tick), and the ingredient provider must wait for the crafting to finish, which an AE interface does if properly configured.

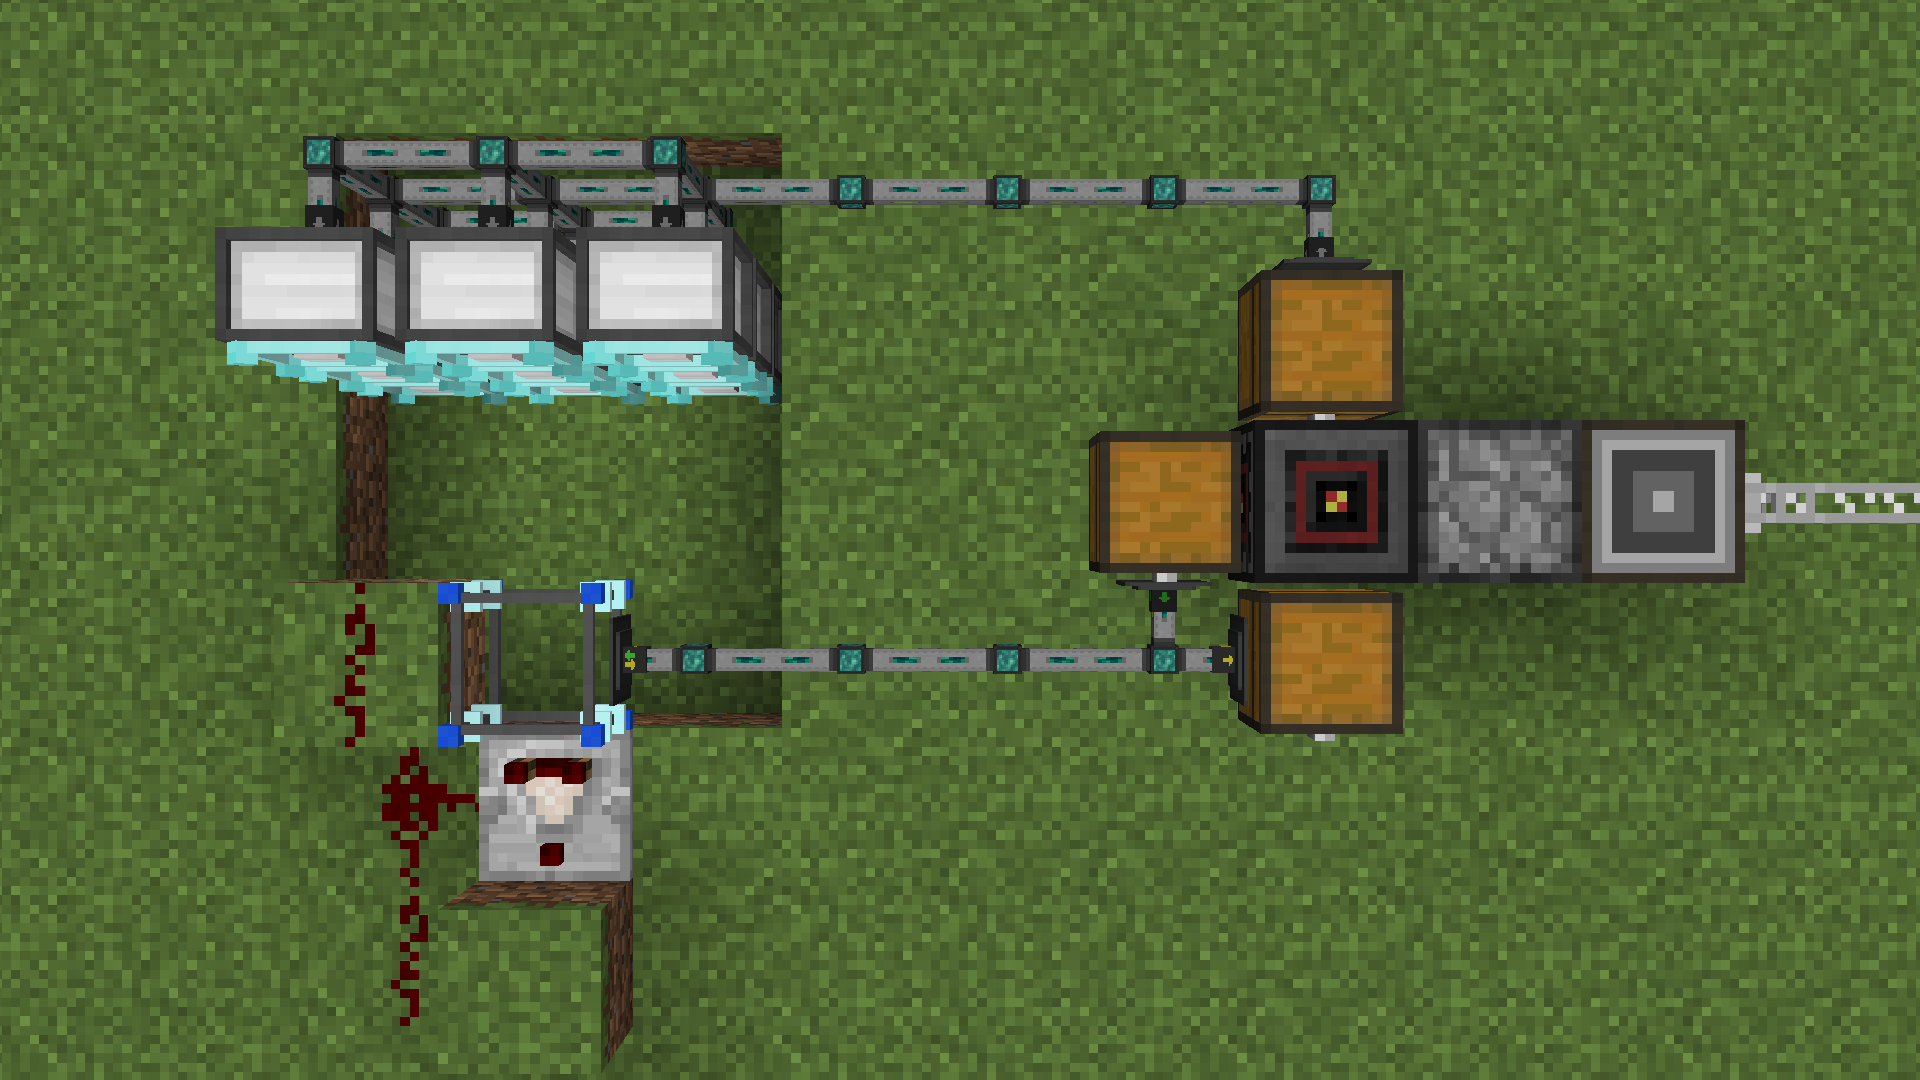
The setup is simple: first, you build something like I did in the picture above(note: you will also need power, and what's between the interface and mc is a dropper that is facing the interface, you will find out why soon). It doesn't have to look same, just act the same. In fact, not even the sides you are going to hook it up matter, you will just have to configure the code accordingly. Then, interface's blocking mode must be enabled(top-left button in it's GUI, set to "do not push crafting items if inventory contains items"). The top-most extractor(in the picture) must be set to round-robin and it must pipe one item at a time(for EnderIO, enable round robin and place a downgrade). To make the mc you need a tier 1 case, CPU , RAM(just 1), redstone card and one transposer, assemble and voila, you are done with that part. The last thing you have to do is to flash an eeprom with the provided code(I assume you know how to do it, look it up), but not before you tweak it a little. If you look at the second paragraph of the code there are some variables that you must define. Those are the sides the mc connects to, and "foo" is the code name of the dummy item I talked about and you must provide, I used stone, which is "minecraft:stone", as you can see, but you can change it to your desire. The other variables' value must be changed to numbers that represent cardinal directions(see the aliases on the sides API to know which number to input, it must be a NUMBER, not "sides.north" or things like that, the code doesn't have the actual side API in it). An exception is matr, which indicates the RELATIVE direction of the side the dropper is adjacent to, and depends on the direction your mc is facing(due to the fact the redstone card works using relative directions while the transposer is using absolute ones). If your mc is facing north, or the actual side is top or bottom, the number is same as mat's, otherwise you just look at the sides API again, but this time at the relative directions.
t = component.proxy(component.list("trans")())
r = component.proxy(component.list("redstone")())

mat = materials aka ingredients
corein = core input
coreout = core output
inj = injectors' input
matr= materials redstone side
foo = "minecraft:stone" --dummy item

function wait(side)
while t.getSlotStackSize(side,1)==0 do computer.pullSignal(0.05) end end --you can change 0.05 to something bigger to save more power but decrease sensitivity

function check(sl) x = t.getStackInSlot(mat,sl).name end

function isntfoo(slot)
if pcall(check, slot) == false then return false end
if x == foo then return false end
return true end

computer.beep(420,0.1)
while true do
wait(mat)

if isntfoo(1) then
t.transferItem(mat,corein,64,1,1)
d = mat
else d = corein end

i=2
while isntfoo(i) do
t.transferItem(mat,inj,64,i,i)
i=i+1
end

wait(coreout)
if d == mat then
i= 1 + t.getSlotStackSize(coreout,1) else i=1 end
t.transferItem(coreout,d,64,1,2)
for j=1,i do
r.setOutput(matr,1)
r.setOutput(matr,0) end
end
For example:
mat = 1
corein = 2
coreout = 3
inj = 4
matr= 1 --my mc is facing north
foo = "minecraft:stone"The redstone card's purpose is to send the items back to the network via dropper. When you turn the mc on it should greet you with just one discreet warm beep to indicate it is on and working. You are almost done, you just need to define the recipes. Important note is that the order in which items come matter. In case of AE, to make a proper recipe pattern you must put the items in it's 3x3 grid in order from top-left to bottom-right. For normal crafting, first slot must be the item going to the core, followed by injector's ingredients, and last comes just one dummy item that you have chosen. After it is done crafting the output and the dummy item is returned. For the "upgrade" mode, you must place one dummy item in the FIRST slot, followed by the ingredients(excluding upgrade keys!). After it is done crafting only the dummy item is returned. Again, note that before upgrading you must place the tool inside the core and the key(if needed) inside any injector, and after you are done you must take those out. Hope you understood how this works, you will do that only if you went along and read everything(or reverse-engineered the code), I did not explain like you were 5, because after all we are on a forum for geeks.
If you have any question(besides what's an "mc", how to craft one, and how to flash an eeprom), suggestion(if feasible) or even an improvement, don't be afraid to post.
Good luck! -
2 hours ago, Exmax said:
It works, thanks
Good to know, so, did you stick with the name or you switched to uuid?
you might as well try changing the i variable with nil to theoretically save some memory if you are into micro-optimization like me, but I am not sure if Lua is ok with that. I would like to know if that works, please
.
-
42 minutes ago, Exmax said:
This returns me with error "attempt to call a table value" :/
my bad, I'm new to lua's syntax and not 100% how that output table is organized, try
for i, element in ipairs(output) do
instead of the original for
-
Not sure if name is for the entity's type, or the name of the player. Try this:
for i, element in ipairs(output)
  print(element.name)
  print(element.uuid) -- those 2 are for debugging purposes first, you can remove them if it works.
  if element.name == "urnamehere" do  --you should use element.uuid instead
  	yourcode()
  	break
  end
 end
If player.name is not your expected output, use element.uuid and your uuid instead, which is recommended anyway.
-
I've heard Plan9k has better multi-threading and virtual components, however I couldn't find any documentation that shows how to use such things, or to even mention plan9k. So, how can I get started with Plan9k?
 .
.
oredict values in Stacks or on geolyzer
in OpenComputers
Posted
whether*
Yes, this is a good idea, but you can get around this for now. Save the block to a database and hash it. then make an oredict table.